
Length: 5-10 minute read
So, someone has asked you, in advance of reopening your church for worship services, to do a Risk Assessment and you can feel the blood drain out of your face and your heart sink into your shoes. This, of course, is just what you signed up to when you went to Bible College – learn pastoral skills, understand preaching, delve into New Testament Greek – Oh, and by the way undertake Risk Assessments on your building and practices. And if you did do it in college, you probably slept through that lesson. I get it – but your denomination, trustees, elders, local government (please add or delete as required) have told you that you need to do it or you cannot reopen. You’ve spent the last three months becoming an internet and tech genius and now all you want to do is get back to loving people, preaching the Word and reaching lost people. Well, don’t panic! All is not lost and there is always hope. Risk Assessing is not a black hole of doom and gloom. You can do it and do it well.
This blog post is not designed to look at reasons, theories or different ways of approaching Risk Management nor is it designed to make you a world expert in Risk Management (you thought a 10 minute blog post would do that!!!). It is designed to give you the basics needed to undertake a Risk Assessment in the context of a church setting. It is written in the context of the UK and is fully compliant with the Health & Safety Executive’s understanding of Risk Assessment (https://www.hse.gov.uk/risk.htm). I have not gone into anything in any particular depth, if you want more info on something, just get in touch through the contact page.
So, one piece of info to start with. You ought to have a template Risk Assessment document to start with. This may have come from your denomination or grouping, in which case use that – it probably isn’t a million miles from other ones. If you don’t have one to hand, don’t create one from scratch! The HSE have a template in Microsoft Word that you can download here.
Principles For Risk Management
It’s really important that you don’t skip this bit and jump to the practical tips. Why? Because you run the risk of seeing the Risk Assessment as a necessary (or possibly unnecessary) evil that gets in the way of you doing your job. If you do that, the process will be painful and the result will be useless.
Risk Management Is About Keeping People Safe
So why is Risk Assessment important? It is important because it is about keeping people safe. It is not about Health and Safety gone mad. It is not about stopping us doing what we cherish most dearly. The best Risk Assessments recognise that you cannot remove all risk and that a certain level of risk is inevitable in all of life. The key is that there are many ‘avoidable’ risks which, if you identify them, you can possibly remove or at least reduce to a far more acceptable level. Then there are significant risks which may need you to ask some difficult questions about how you move forward, but it is better to do that before you start moving forward than in the middle of a crisis caused because you didn’t think about something in advance. As church leaders, we care about people and if we do care about them, we will want to keep them as safe as possible.
Risk Management Is Not A One-Off Checklist
I’m sorry to burst the bubble on this but you can never tick off that you have completed Risk Management! You will undoubtedly become more proficient at it but Risk Management is an ongoing part of life in every organisation. A Risk Assessment document is a ‘live’ document which should be reviewed on a regular basis. In normal circumstances, you may only review it bimonthly/quarterly. You should also review your Risk Assessment if there are any significant changes in Government regulation. If you are part of a denomination, then your headquarters will hopefully keep you up to date on regulatory changes and, in the UK, please remember that many of the regulations for Health & Safety are devolved to the various administrations of the British Isles (Scotland, Wales, Northern Ireland, Isle of Man, Guernsey, Jersey & Republic of Ireland), with the UK Government largely only regulating England.
So, let’s get on to the five steps of undertaking a Risk Assessment…
Step 1: Identify The Hazards
The first thing to do is identify each and every hazard. This includes hazards in your actual building but also in the processes you have. So you need to risk assess the way you welcome people into church as well as the actual doors and passage-ways. There is no way of getting around the fact that the only way that you can really do an effective process of identifying hazards is to actually walk around your facility and think with mindset of your various services and activities. A really good way of doing this is to take someone with you, ideally someone who is not a member of your church. Why not contact a colleague from another local church and offer to partner up on each other’s Risk Assessment. They could come in with fresh eyes and notice things that you wouldn’t. Of course, make sure that you are following all relevant public health guidance and ensure that you are socially distanced, wearing a face covering and washing your hands thoroughly and frequently.
In essence, at this step you look around and think, what can go wrong here? Now, I need to be clear, you can fill volumes of paper with risk assessments if you put everything down. You should have a Risk Register with general risks on it. For example, if you notice that the carpeting in one area of the building is loose and could potentially trip someone up, this should be on your routine church Risk Register. It may only stay there for a week until someone is able to come in and fix the problem but it may mean that you put that area out of action until the problem is fixed. However, trivial risks really should be excluded. If you spot a banana skin on the floor, you don’t need to note a risk of people slipping and falling over, you simply pick up the banana skin!
If you are hiring a building from someone else (eg A Community Hall), you will still need to undertake a Risk Assessment yourself for what YOU control but the first item on your Risk Assessment should be a general Building Risks category and the action should be that you Receive and Review the building owner’s Risk Assessment. Personally, I would ask for a copy which you can attach to your own Risk Assessment. If they don’t have one, I would question whether you should be considering hiring the building. Similarly, if you hire your own building out to others, you should ask them to undertake a Risk Assessment on their processes and protocols (and provide it to you) and you should provide them with a copy of your Building Risk Assessment.
Step 2: Decide Who May Be Harmed And How
So, you’ve spotted an issue. Now you need to decide who is potentially at risk and in what way. For some issues, it may be everyone entering the building but for other risks it may just be staff or volunteers. Don’t just say ‘everyone’ for everything as that is unlikely to be true. So, be specific. An example may be the regular deep cleaning that will now become the norm for churches as we move out of lockdown. You may want to say that all staff/volunteer cleaners are at some level risk and so you will provide appropriate equipment and PPE for everyone involved in cleaning. However, you may decide that some groups of staff/volunteers are at greater risk, such as those over 50 or 70 years of age, men or part of the BAME community (or a combination of these). In these circumstances you may decide to risk assess individuals or prevent them from being involved in the cleaning of the building. We will come to how you make these decisions in a moment but the key here is deciding who may be harmed and how.
Step 3: Evaluate The Risk
This is the bit that many people find difficult, when it doesn’t need to be. For my own denomination (Elim Pentecostal Churches), we have been asked to grade the risks as either Low, Medium or High. Why is this important?
Well, in a document that may have 20, 30 or more risks, you need to know which risks are going to have the greatest impact so that you can focus on removing or reducing those risks as a priority. The easiest way to measure these is by giving them some form of grading.
Before, you go on to grading your risks, I would note down what controls you already have in place. This is because you may already have things in place which reduce the risk. So, taking a general example of the risk of fire taking hold in the building. This would rank in the very high category in terms of impact and possibly in a church that had lots of real candles, the likelihood could also be high. However, you probably already would have fire detection systems (fire/smoke alarms, sprinklers etc) and would probably also have fire doors around the building to prevent the spread. So you have already reduced the risk without doing anything. Therefore, I would list what is already in place first and then grade your risks. However, you should do the grading before deciding on NEW steps you are going to take.
So, how do you do this grading?
The danger of sitting and asking yourself if something is High, Medium or Low is that this is incredibly subjective. Therefore, most professional Risk Assessment processes use a matrix which you may want to have in your thinking, even if you don’t use it directly. It easiest to show it initially as a diagram.
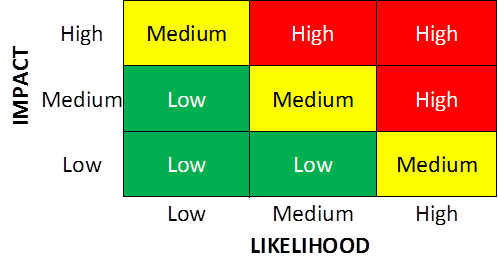
There are two factors you look at with risk.
- What is the impact/consequence/outcome of this risk? You can also define the levels of this as Minor/Negligible (Low), Moderate (Medium) and Major/Catastrophic (High)
- What is the likelihood/chance of this risk happening? You can also define the levels of this as Rare/Unlikely (Low), Possible (Medium) and Likely/Almost Certain (High)
You could, if you wanted to, put a 1, 2 or 3 score against each of these and multiply the two together to give you an overall risk score (Impact x Likelihood = Risk and then give an overall risk grade according to the score (1-2 = Low overall risk, 3-4 = Moderate overall risk, 6 or 9 = High overall risk)). For most church based risks simply referring to the grid above should be sufficient to make a straight forward judgment. If should be noted that if you have something in the top right hand box (perhaps an Extreme Risk) then this should be a priority for removing or reducing the risk as it is your highest risk item.
Once you have decided the risk level for each hazard, then you should record this on your form (you would need to add a column to the HSE template document for this).
Step 4: Decide On Action To Remove, Reduce or Mitigate The Risk
So, now you sit and ask yourself two questions,
- Is there anything I can do which would remove this risk completely? In the example regarding candles above, you could decide to not have any naked flames in the building and use battery powered candles. If you did that, you would have removed the risk altogether.
- If you cannot remove the risk completely, are there any steps you can do which would reduce or mitigate the risk? For many of your risks, you won’t be able to get rid of the risk completely but you can reduce the risk. If what you are thinking of wouldn’t make any difference at all, it may not be worth doing! But there are often things you can do both in terms of structural/physical/building changes but also in terms of processes and procedures. Therefore, using the candle fire risk once again. If it was decided that you couldn’t get rid of real flame candles for some reason, you could introduce both structural changes (such as a metal frame for real candles, fire extinguishers placed near candles, only small candles to be used etc) and procedural changes (regular checks on areas with candles by staff members, building closure protocol which checks on areas with candles etc). These steps would mitigate or reduce the risk of a large scale fire breaking out and reduces the risk.
The challenge of only using three risk levels is that sometimes your changes may not change the overall risk level but may move it from a ‘high moderate’ to a ‘low moderate’ which is obviously not shown in a three level system. This is why most professional risk assessment processes use a 5 x 5 matrix which allow more subtle change. However, this shouldn’t make you worry. Use the model you have and try to keep it as simple as possible. It is better to have a basic, completed Risk Assessment than a complicated one which is sitting on scraps of paper and only covers one room!
Once you have decided on the actions and controls you can put in place and have graded each risk, you should make sure that this is all recorded on your Risk Assessment/Register. Make sure that for every control/adaptation you are going to do that you put a name (or role) for who is going to do this and a date by which the action will be completed. These are so important in order that individuals know who is responsible for undertaking the various controls. Ideally, distribute the work, so that it doesn’t rest on one person’s shoulder in terms of workload but also in terms of responsibility. Risk and safety is everyone’s responsibility and if you distribute the work out, people will quickly realise that this is not just the Senior Pastor’s hobby-horse. Everyone plays their part.
Step 5: Monitor Your Risk Assessment & Update Regularly
This brings us back to the introductory comments on the fact that a Risk Assessment is a live document which is constantly evolving. You should certainly have a final column on your Risk Assessment for you to show when the controls you state you are going to put in place have actually been completed. If you can’t complete them by the date you said, don’t just change the target date, give an explanation and an updated target.
Once you have held completed tasks on the Risk Assessment for a specific period (perhaps 6 months but it is up to you) and they have been reviewed by your Leadership Team, they can then be archived in the document so that the live Risk Assessment is holding the current risks and you don’t need to trawl through pages of completed hazards. However, don’t remove them completely, otherwise you might finding someone new coming along and putting the risk that you have completed back on the Assessment as a new one.
Conclusion
Of course, Risk Management is an academic discipline in it’s right and there are entire companies given over to Risk Management but in the current situation of churches needing to complete a basic Risk Assessment to ensure that they are ready to reopen their buildings once Government restrictions allow, then the key advice I would give each and every person is:
- Keep it simple (you can always build on it)
- Keep it relatively high level (you can always provide more detail if required)
- Keep it achievable (don’t say you’ll do everything by tomorrow morning – you have other, more important, things to do)
- Keep it honest (don’t hide things – if you have issues, highlight them – its OK)
- Keep it humble (if you need help, ASK)
You can do this. It isn’t actually rocket science!